 STARTUP
DG2100S Operating Instructions
STARTUP
The DG2100S controller will start automatically when plugged in. The factory settings are:
First Stage: When temperature is above 78oF, water is on 1 minute, off 10 minutes.
Second Stage: When tempererature is above 88oF, water is on 2 minutes, off 10 minutes.
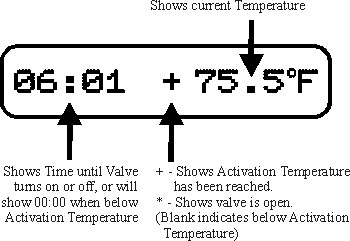
Even if the controller is left unplugged for long periods of time, all settings will be retained. Once in operation, the controller will Smart-Scan, or display its settings every few minutes. It also will show whether the room temperature is higher than the set temperature with a (+) plus symbol in the middle of the display. Valve running or open is shown with a (*) symbol.
CHANGING SETTINGS
If
the factory settings of the DG2100S are not to your liking, all of
the settings are easy to change. There are two buttons on the face of
the controller, marked![]() and
and ![]() .
The
.
The ![]() button is used to alter the settings currently in the controller.
The
button is used to alter the settings currently in the controller.
The ![]() button is used to enter the menu screens and move to each of the
different settings.
button is used to enter the menu screens and move to each of the
different settings.
 1.
To begin, press the
1.
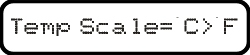
To begin, press the ![]() button once. This will cause the screen to display the message,
“Temp Scale=oC³oF”,
with the cursor blinking on the arrow. If the valve was open,
it will automatically close, until you are done adjusting the
controller’s settings.
button once. This will cause the screen to display the message,
“Temp Scale=oC³oF”,
with the cursor blinking on the arrow. If the valve was open,
it will automatically close, until you are done adjusting the
controller’s settings.
2.
This first menu screen sets whether the controller measures
temperature in degrees Fahrenheit or degrees Celsius.
The DG2100S controller comes set to Fahrenheit. If you
wish to switch to Celsius,press the ![]() button. The arrow will flip toward “oC”.
When the arrow is pointing to the desired temperature scale, press
the
button. The arrow will flip toward “oC”.
When the arrow is pointing to the desired temperature scale, press
the![]() button again.
button again.
(Please note: If you change the temperature scale, the controller will reset the activation temperatures to zero. Please be sure to set them in steps 4 and 7.)
 3.
The controller will display, “.First Stage”. The
single dot before the F indicates that you are about to set
First Stage settings, that is, the lower of the two activation
temperatures and its watering times. Press
3.
The controller will display, “.First Stage”. The
single dot before the F indicates that you are about to set
First Stage settings, that is, the lower of the two activation
temperatures and its watering times. Press ![]() to advance to the next screen.
to advance to the next screen.
4.
“.Set
Temp=78.0oF” will be
on the controller display or whatever other temperature is currently
set. The cursor will be flashing on the tens digit of
the temperature. Press the ![]() button to increase the tens digit of the temperature to
whatever new number you require. Any value within zero to nine
will be accepted. Press the
button to increase the tens digit of the temperature to
whatever new number you require. Any value within zero to nine
will be accepted. Press the ![]() button to advance the cursor to the ones digit of the
temperature.
button to advance the cursor to the ones digit of the
temperature.
Holding the button down will not advance the setting; you must press once for each increment.
5.
The cursor is now at the ones digit of the first set
temperature. Again, press the ![]() button to change the ones digit to any number, zero to nine.
When the correct ones digit is in place, press the
button to change the ones digit to any number, zero to nine.
When the correct ones digit is in place, press the ![]() button to advance the cursor to the tenths place of the
temperature.
button to advance the cursor to the tenths place of the
temperature.
(If you accidentally enter the wrong number at any point, it is OK to press the button through all of the remaining menus and start again to correct the error.)
6.
The cursor is now at the tenths place of the temperature.
Again, press the ![]() button to adjust the tenths digit to whatever number is
desired. When the correct number is in place, press the
button to adjust the tenths digit to whatever number is
desired. When the correct number is in place, press the![]() button to advance to the next screen.
button to advance to the next screen.
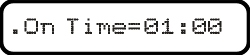 7.
The controller will display, “.On
Time=01:00". (Or whatever
the On Time is currently set to.) This indicates that
when the temperature is above the first temperature, and below the
second temperature, the valve will open for one minute
and zero seconds. This time can be changed to anything from
zero minutes and one second, (00:01), to ninety-nine minutes
and fifty-nine seconds, (99:59). Each digit is adjusted
with the
7.
The controller will display, “.On
Time=01:00". (Or whatever
the On Time is currently set to.) This indicates that
when the temperature is above the first temperature, and below the
second temperature, the valve will open for one minute
and zero seconds. This time can be changed to anything from
zero minutes and one second, (00:01), to ninety-nine minutes
and fifty-nine seconds, (99:59). Each digit is adjusted
with the ![]() button. When the digit is correct, advance to the next with
the
button. When the digit is correct, advance to the next with
the ![]() button.
button.
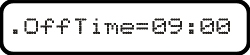 8.
Once the On Time is set, the controller will display, “.Off
Time=09:00". This
indicates that when the temperature is above the first set
temperature, & below the second set temperature, the controller
will keep the valve closed for 9 minutes between On
Times. This value, like the On Times, can be set to
anything between 00:01 and 99:59 and is set the same
way.
8.
Once the On Time is set, the controller will display, “.Off
Time=09:00". This
indicates that when the temperature is above the first set
temperature, & below the second set temperature, the controller
will keep the valve closed for 9 minutes between On
Times. This value, like the On Times, can be set to
anything between 00:01 and 99:59 and is set the same
way.
 9.
After the First Stage Off Time is entered, the controller will
display, “:Second Stage”. The two dots in
front of the “S” are to remind you that you are now
entering Second Stage settings. Whenever the temperature
is higher than the Second Stage temperature, the controller
will ignore the First Stage times, and run the valve
with the Second Stage times. Entering the Second
Stage Temperature, On Time and Off Time is
identical to the First Stage settings in steps 3 - 8.
(Remember: the Second Stage Temperature must be higher than
the First Stage temperature. The controller will not
allow you to leave that screen until you have entered a temperature
higher than or equal to the first.) After entering the last digit of
the Second Stage Off Time, the controller will pause
momentarily to store your settings in permanent memory, and will then
resume operation with the new settings.
9.
After the First Stage Off Time is entered, the controller will
display, “:Second Stage”. The two dots in
front of the “S” are to remind you that you are now
entering Second Stage settings. Whenever the temperature
is higher than the Second Stage temperature, the controller
will ignore the First Stage times, and run the valve
with the Second Stage times. Entering the Second
Stage Temperature, On Time and Off Time is
identical to the First Stage settings in steps 3 - 8.
(Remember: the Second Stage Temperature must be higher than
the First Stage temperature. The controller will not
allow you to leave that screen until you have entered a temperature
higher than or equal to the first.) After entering the last digit of
the Second Stage Off Time, the controller will pause
momentarily to store your settings in permanent memory, and will then
resume operation with the new settings.
© Copyright 1999 Greenhill Manufacturing, LTD. All rights reserved.